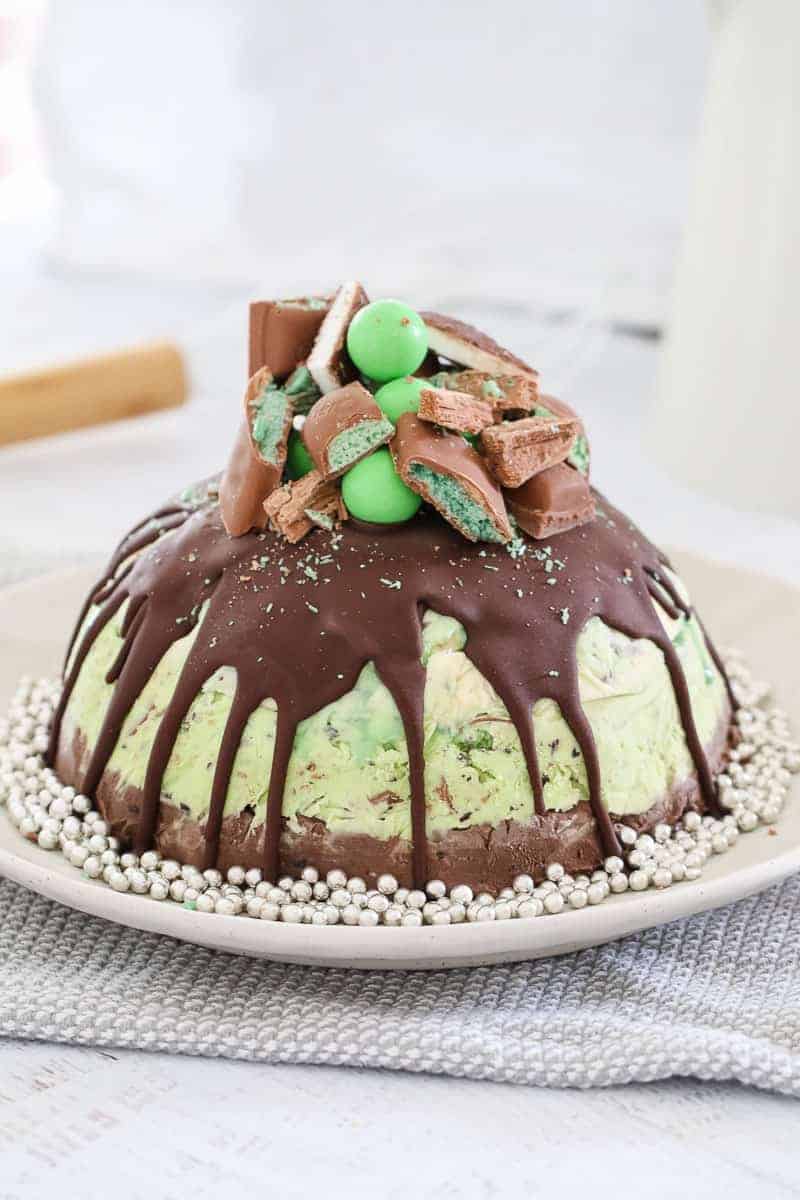
A triple layered Mint Christmas Ice Cream Cake packed full of cookies, mint chocolates and more! This delicious Christmas dessert can be prepared well ahead of time and is perfect for serving a crowd.

T’s no doubt that the classic combination of mint and chocolate is simply THE BEST!
Whether you’re making mint rocky road, a chocolate mint slice or this delicious chocolate mint ice cream cake… you’re sure to satisfy even the greatest of mint chocolate cravings!

3 Layer Christmas Ice Cream Cake
This show-stopping Christmas Ice Cream Cake couldn’t possibly be any more delicious!
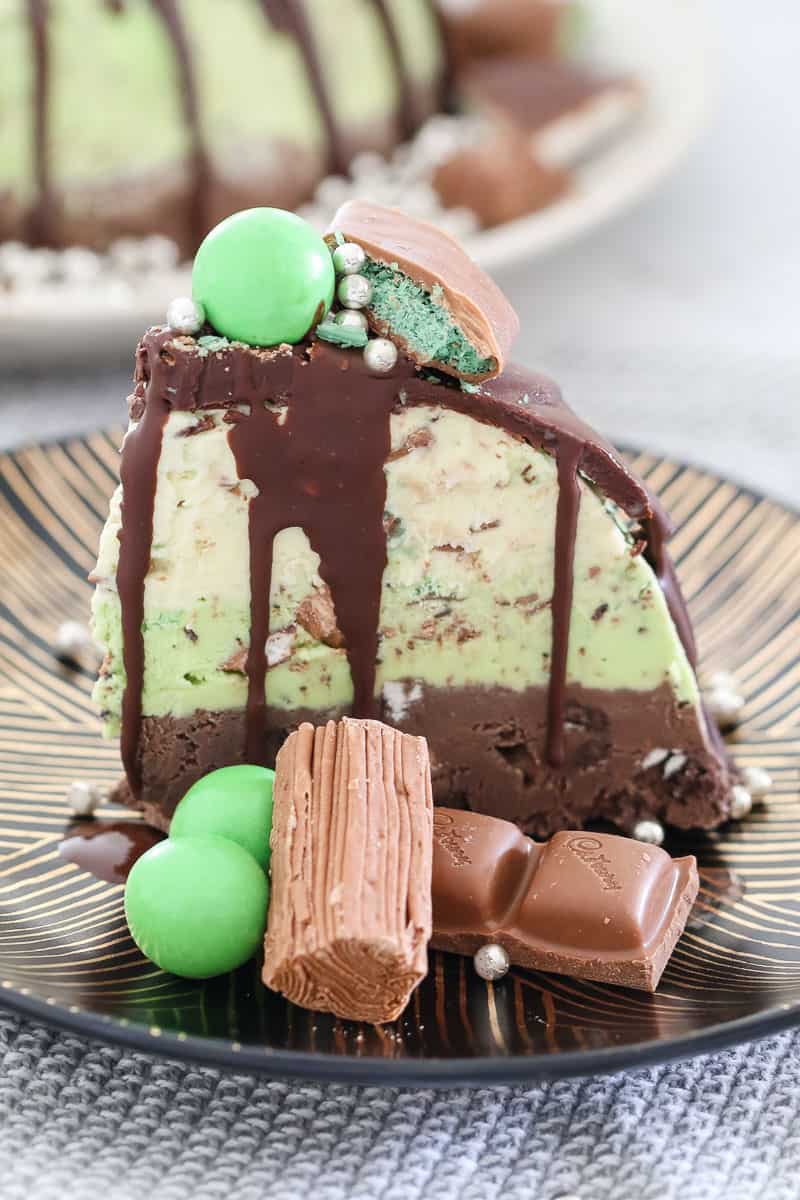
The three simple layers will leave you drooling…
- Layer 1 – Chocolate ice-cream mixed with crushed chocolate biscuits and chunks of chocolate
- Layer 2 – Mint ice-cream packed with chopped Mint Patties and Mint Aero bars (see substitutes below)
- Layer 3 – Vanilla ice-cream with crushed Peppermint Crisp bars sprinkled throughout
Finished with a hard chocolate shell topping and plenty of extra mint chocolates for decoration.
This really is the ULTIMATE Christmas Mint Ice Cream Cake.
What You Need
This versatile Christmas ice cream cake allows you to mix and match all of your favourite mint chocolates.
I have used mint chocolates that are popular in Australia, however, if you live elsew in the world, hit up the confectionary aisle of your local supermarket and choose all of your favourites!
Please scroll to the recipe card at the bottom for ingredient quantities and the full detailed method.
- Vanilla Ice Cream – choose your favourite brand of vanilla ice cream.
- Chocolate Ice Cream – as with the vanilla ice cream, use any brand of chocolate ice cream you like.
- Mint Ice Cream – you can choose to use plain mint ice cream or add in some extra chocolate by using mint chocolate chip ice cream.
- Oreo’s – crushed Oreo cookies are used in the chocolate ice cream layer. The cookies will soften over time, making them extra delicious!
- Chocolates – I used the following chocolates, however, you can substitute these with absolutely any type of mint chocolates you have available to you: Mint Patties, Peppermint Crisp bars, Mint Aero bar and Flake bar. I also used Darrell Lea Peppermint Chocolate Balls and Cadbury Peppermint Chocolate bars (for decorating).
- Ice Magic – also known as Magic Shell. This is poured over the top of the ice cream cake and sets hard.
- Silver Cachous – these small edible silver balls can be bought from the baking section of the supermarket (generally near the 100s and 1000s or sprinkles).

Step By Step Instructions
It couldn’t be easier to make this simple Christmas mint ice cream cake!
Just ensure that you allow yourself an hour to prepare it, as each layer needs to set firm before adding the next layer, then freeze overnight before decorating.
Step 1 – Prepare The Tin
Line an 8 cup capacity bowl or pudding tin with cling wrap, allowing the edges to overhang.
If you don’t have a deep bowl or a pudding tin, you can use a regular round cake tin.
TIP: It’s important to have the cling wrap hanging over the edge to help you remove the ice cream cake from the tin once you’re ready to serve it.
Step 2 – Prepare The Vanilla Layer
Allow the vanilla ice cream to soften just enough so that it can be mixed with the add-ins.
TIP: The vanilla ice cream should be soft enough to stir firmly with a spoon but not completely runny.
Stir through the crushed Peppermint Crisp bars, pour into the prepared tin and smooth the top of the ice cream layer with a spoon.
Freeze for 30 minutes.
Step 3 – Prepare The Mint Layer
Allow the mint chocolate ice cream to soften slightly and then stir through the chopped mint chocolates.
Spread the mint ice-cream over the vanilla layer, smooth the top with a spoon and place back into the freezer for a further 30 minutes.
Step 4 – Prepare The Chocolate Layer
Allow the chocolate ice cream to soften slightly and stir through the crushed Oreos and chunks of crumbled Flake bar.
Spread over the mint ice cream layer, smooth the top with a spoon and cover the top with a layer of cling wrap.
Step 5 – Freeze Overnight
It’s important to freeze this Christmas Ice Cream Cake overnight (however it can be made further ahead of time if you prefer).
Step 6 – Decorate
When you’re ready to decorate, remove the top layer of cling wrap and turn the ice cream cake upside down onto a serving plate.
Remove the outside layers of cling wrap.
TIP: If the ice cream cake is hard to remove from the tin, rub your warm hands around the outside to soften and loosen. Pull firmly on the cling wrap to help lift the cake out.
Pour the Ice Magic over the top and decorate with extra mint chocolates and silver cachous.
TIP: It’s important to work quickly to decorate as the Ice Magic will set very quickly. You can always add a little extra Ice Magic to the top to help ‘stick’ the chocolate decorations on.
Place back into the freezer for 20 minutes. Serve immediately.

Expert Tips & FAQ
Some of the mint chocolates you’ve used aren’t available w I live. Can I substitute them?
Yes, absolutely! I have used mint chocolates that are popular in Australia, however, you can substitute them with any variety of mint chocolates you like.
What is Ice Magic?
Ice Magic is also known as Magic Shell. It is a bottle of liquid chocolate that sets hard when poured onto ice cream. If Ice Magic or Magic Shell aren’t available w you live, you can use melted chocolate instead.
How far in advance can I make this Christmas Ice Cream Cake?
The ice cream cake needs to be prepared at least the day before serving. You can however, prepare it a week ahead of time. For best results, I recommend decorating it on the day of serving.
Storing
Store any leftover ice cream cake in an airtight container in the freezer for up to 1 week.

Who doesn’t love a simple ice cream cake!
Here’s a few more of my favourite ice cream cake recipes…
Follow us on Facebook at @CookGoodRecipes
Mint Christmas Ice Cream Cake
A delicious triple layer Christmas ice cream cake! Chocolate, vanilla and mint flavoured ice-cream layers packed full of cookies, chocolates and more!
Course: Dessert
Cuisine: Christmas, ice-cream
Prep Time: 1 hour hour
Chilling Time: 12 hours hours
Total Time: 13 hours hours
Servings: 12 serves
Calories: 434kcal
Ingredients
Vanilla Layer
Mint Layer
Chocolate Layer
For Decorating
Metric – US Customary
Prevent your screen from going dark
Instructions
- Line an 8 cup capacity bowl with two sheets of cling wrap, allowing the sides to overhang.
- Take the vanilla ice cream out of the freezer and allow it to soften (but not completely melt). Add the crushed Peppermint Crisp bars and stir to combine.
- Spoon into the bottom of the cling wrap lined bowl, smooth the top with the back of a spoon and place into the freezer for 30 minutes or until set.
- Take the mint ice cream out of the freezer and allow it to soften. Mix in the chopped mint chocolates and spread over the top of the vanilla ice cream layer. Place back into the freezer for 30 minutes.
- Take the chocolate ice cream out of the freezer, mix in the chopped Oreos (or chocolate biscuits) and the chopped Flake bar and spread over the top of the mint layer.
- Place back into the freezer and cover the top with cling wrap. Leave overnight.
- When you’re ready to decorate the Christmas ice cream cake, take it out of the freezer, remove the cling wrap and turn out on to a serving plate.
- Pour the Ice Magic all over the top of the pudding, allowing it to drip down the sides (note: you won’t need the entire bottle).
- Decorate with extra mint flavoured chocolates (see notes).
- Place back into the freezer for 20 minutes.
- Serve immediately.
- Mint Patties
- Peppermint Crisp Bars
- Mint Aero Bars
- Cadbury Flake Bars
- Darrell Lea Mint Chocolate Balls
- Cadbury Peppermint Chocolate
Notes
RECIPE NOTES & TIPS:
You can use any mint flavoured chocolates you like in this recipe. I used the following:
These are all available from supermarkets in Australia. If you’re outside of Australia, simply use any mint flavoured chocolates you have available.
Ice Magic – is also known as Magic Shell. This is poured over the top of the ice cream cake and sets hard. If Ice Magic or Magic Shell aren’t available w you live, you can use melted chocolate instead.
Silver Cachous – these small edible silver balls can be bought from the baking section of the supermarket (generally near the 100s and 1000s or sprinkles).
Removing The Cake From The Tin – if the ice cream cake is hard to remove from the tin, rub your warm hands around the outside to soften and loosen. Pull firmly on the cling wrap to help lift the cake out.
Decorating – it’s important to work quickly to decorate as the Ice Magic will set very quickly. You can always add a little extra Ice Magic to the top to help ‘stick’ the chocolate decorations on.
Make Ahead – the ice cream cake needs to be prepared at least the day before serving. You can however, prepare it a week ahead of time. For best results, I recommend decorating it on the day of serving.
Storing – store any leftover ice cream cake in an airtight container in the freezer for up to 1 week.
Recipe by CookGoodRecipes.com
Nutrition
Calories: 434kcal | Carbohydrates: 53g | Protein: 7g | Fat: 22g | Saturated Fat: 13g | Cholesterol: 76mg | Sodium: 186mg | Potassium: 422mg | Fiber: 1g | Sugar: 45g | Vitamin A: 785IU | Vitamin C: 1.2mg | Calcium: 230mg | Iron: 1.4mg


